
An aluminum boat is inexpensive to maintain, stable in the water, and great for fishing. However, they can be a bit small, and you may find that you struggle to cast from them. However, designing, manufacturing, and installing a plywood casting deck is the solution, and, in fact, it is pretty simple to achieve.
Let’s go through the simple steps in order for you to make a perfectly sized and fitted casting deck for your aluminum boat that will bring you years of pleasure out on the water.
How To Build A Casting Deck On An Aluminum Boat
Building a casting deck for your aluminum boat may not be as tricky as you think. A little DIY and some time will help you turn your aluminum boat (sometimes referred to as a johnboat) into the fishing boat of your dreams.
Before we dive into the step-by-step tutorial, you will need to consider one thing. Depending on the shape of your boat, you may want to build a removable casting deck with a frame designed on it using wood (2X1s), or you can mount the frame to the boat using square-edged aluminum piping.
This will all depend on the front section of your aluminum boat and how its perpendicular bracing is structured. In any event, implementing aluminum braces to your boat is not that much of a challenge, and we will cover that as well.
Step 1. Measure The Casting Deck Area
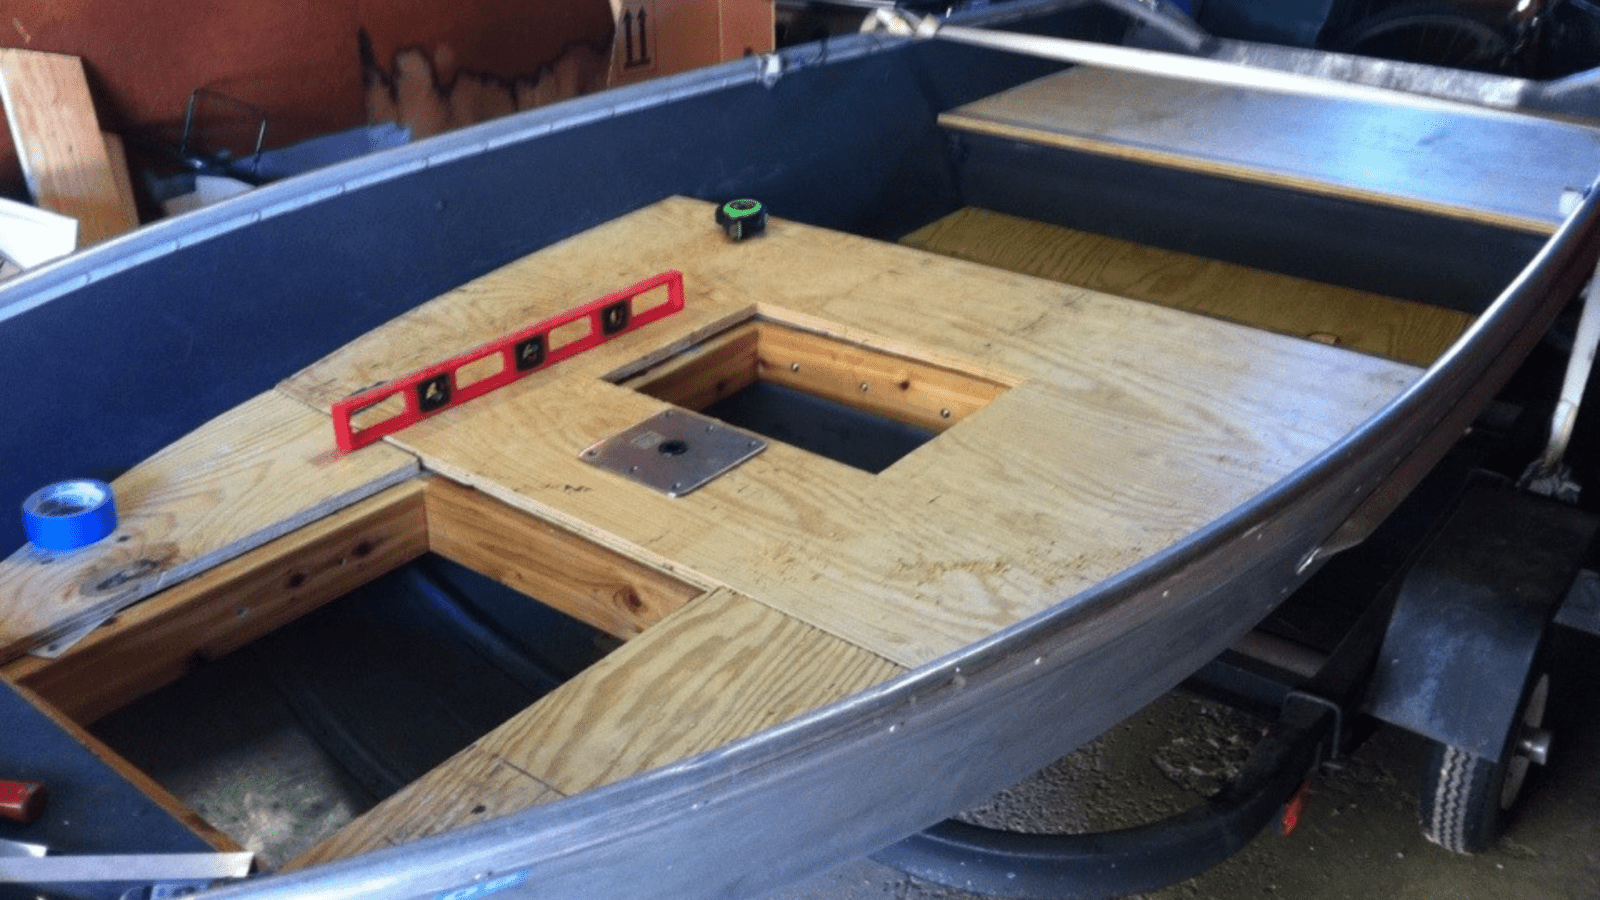
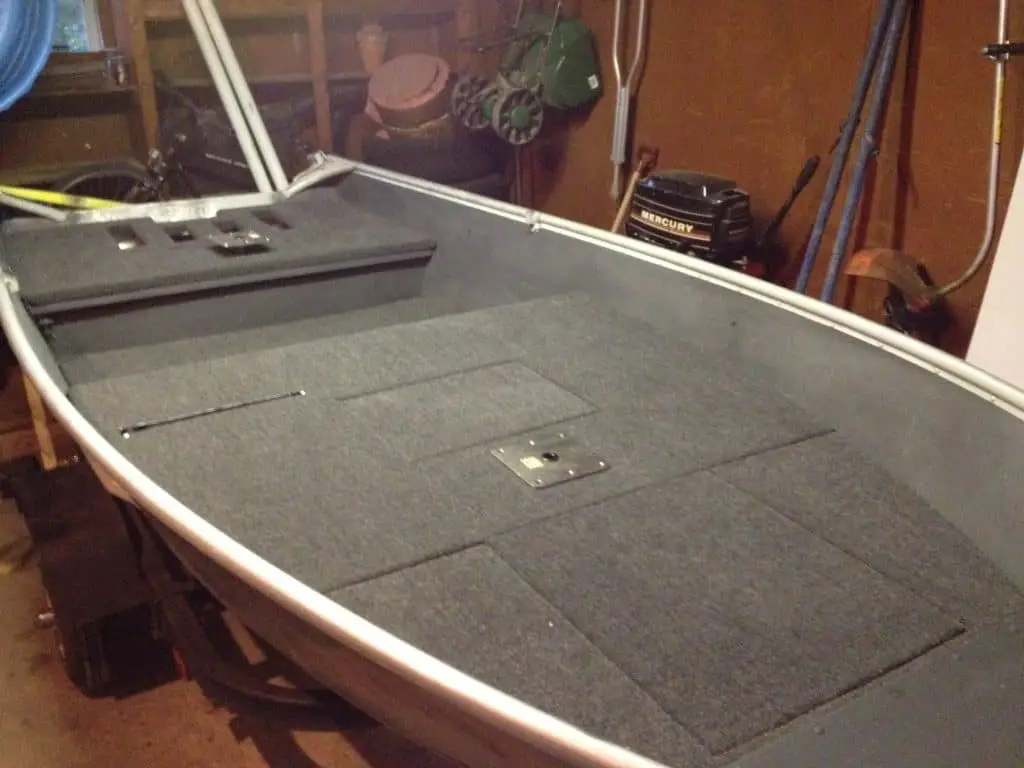
What you will want to understand here is that your casting deck will essentially be the size of the internal space of the boat. However, what you first need to do Is measure the width and length of the boat so you can head to your local hardware store and pick up some 1/2″ plywood that will serve as it.
It will help if you remember that you are trying to determine how much plywood you will need to fabricate the raised casting deck.
The width of the boat will be simple to measure. All you will need to do is measure the widest section of the boat and add a couple of inches. This will allow for any oversight. To measure the length, you will need to determine how long you want your casting deck to be.
Typically, most individuals place it in line with the first perpendicular bracing of the boat. This will give you ample room to stand or sit (if you install a swivel seat). Take into consideration that some boats have their first bracing situated quite close to the bow. In this instance, you will want to calculate the length to the second bracing.
Thus to determine the size of the plywood that will make up your casting deck, you will measure the maximum width of the boat and from the bow to the first or second perpendicular bracing. Remember to add a few inches for compensation.
You will want to make sure (if you can) to purchase one piece of plywood. This is because it will offer more in the way of stability, and less water will be able to seep through it.
Step 2. Measure The Shape Of The Casting Deck Area
Now that you have your 12mm plywood, you will need to cut it to size. However, it would be best if you determined the internal shape of the boat so you can cut it to size, and to cut the plywood precisely to size you will use a template.
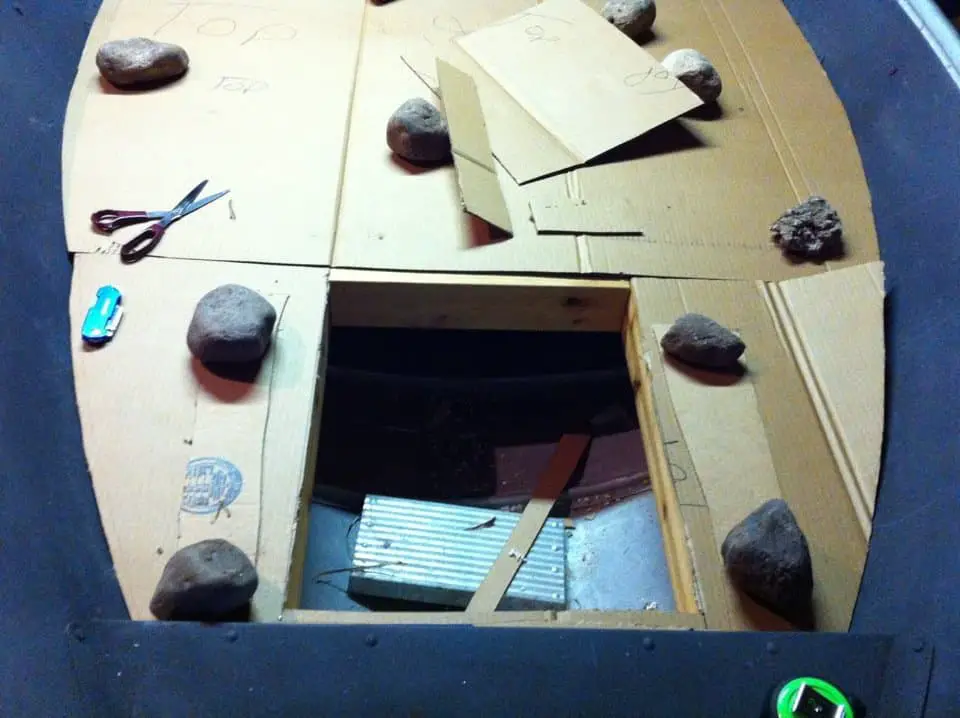
The simplest way to construct a workable template is to use cardboard. You will want to cut out the general internal shape of the boat by placing the cardboard inside.
When you have placed the cardboard in the boat, you will want to press it down and start cutting out the shape with a utility knife. Don’t worry about getting the precise size and making it fit perfectly (we will do that next). All you want to do here is to get the general shape.
Once you have cut out the cardboard, you can place it back into the boat. At this point, the template should fit easily into the boat, but there may be gaps along the edges of the template.
What you will now do is cut out separate pieces of cardboard and align them with the edges of the boat and template. You will then stick them to the template using some tape or glue. You will proceed to do this (cut as many pieces as needed) and create a template that fits perfectly into the space of the boat that will serve as your casting deck.
Step 3. Cut Out The Casting Deck
Once you have the template, you are now able to cut out the shape of the casting deck from the plywood.
You will place the plywood on a raised surface (preferably on some stands), then you will place the template on top of the plywood and mark it out using a pencil or some form of marker.
Now you will cut out the plywood casting deck using a jigsaw. Take into consideration that you will need to cut out the entire casting deck because we said you should opt to add a few inches to the length and width of it. In the event you make a mistake or need some extra wood to fill in any edges, this will come in handy.
Make sure that you cut inside the line (approximately one-half inch). This is because you will want to leave a little room for the carpet. Remember that you will place carpet around the casting deck and fold it around the edges. Don’t worry if you think you are cutting too far inward. You can always add additional pieces of plywood to the edges if you have cut off too much.
Step 4. Check That The Deck Fits, Sand, And Make Adjustments
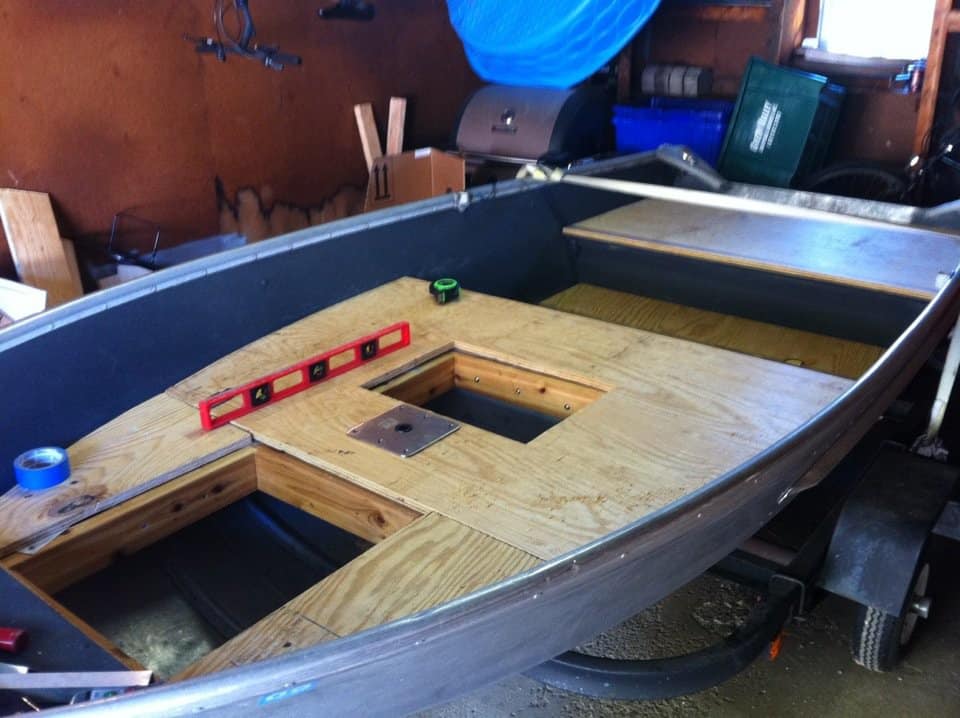
Once you have cut out the deck, you will want to check that it fits snuggly into your aluminum boat. For the most part, if you cut out the template and plywood correctly, it should fit more or less with just a little space around it to compensate for the carpet.
At this point, if the casting deck has edges that are too wide, you would measure and cut as many plywood pieces to size as needed. Then you would fasten them to the edges using screws and some wood or marina glue.
Once you have made sure that everything is to spec with how the casting deck fits in the boat, you will use a sander to smooth out the edges.
Now, you will need to consider if you are going to require any additional space, such as using a trawling motor. If this is the case, then you will need to manufacture a cubby hole where it will sit.
The process for this is quite simple. Measure the batter size and then mark out the dimensions in the area where you would want to place it in your casting deck. Add some room to the dimensions so you will be able to get the battery in and out with ease.
Once you have marked out the space on the casting deck, drill a hole through the deck that is big enough to allow the jigsaw blade through it and cut it out.
Remember that you will want to use the cutout piece of plank for your hatch door, so try and cut it out as neatly as possible. The same concept will apply to the hatch door as it did for the deck. That is, you will want to shave off some of the edges so that you are able to cover it with carpet.
Step 5. Design And Fabricate The Frame
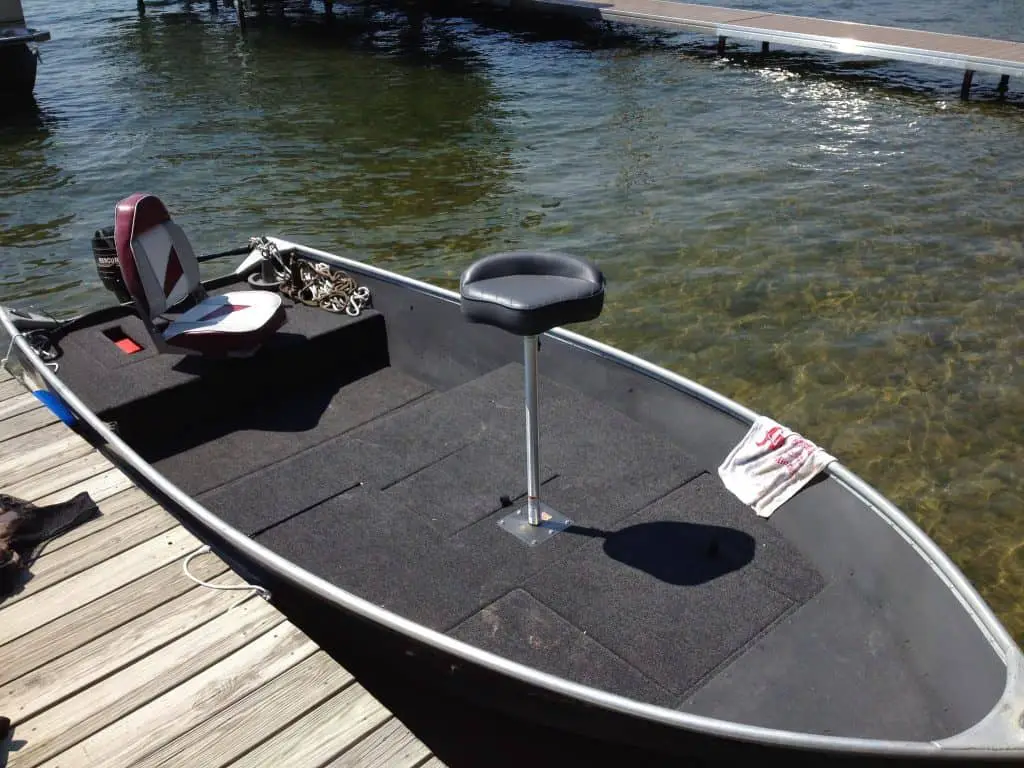
This is the point where you will decide whether or not you will make the casting deck detachable. There is no right or wrong answer here. It will depend on the shape and size of your boat and then your personal preference.
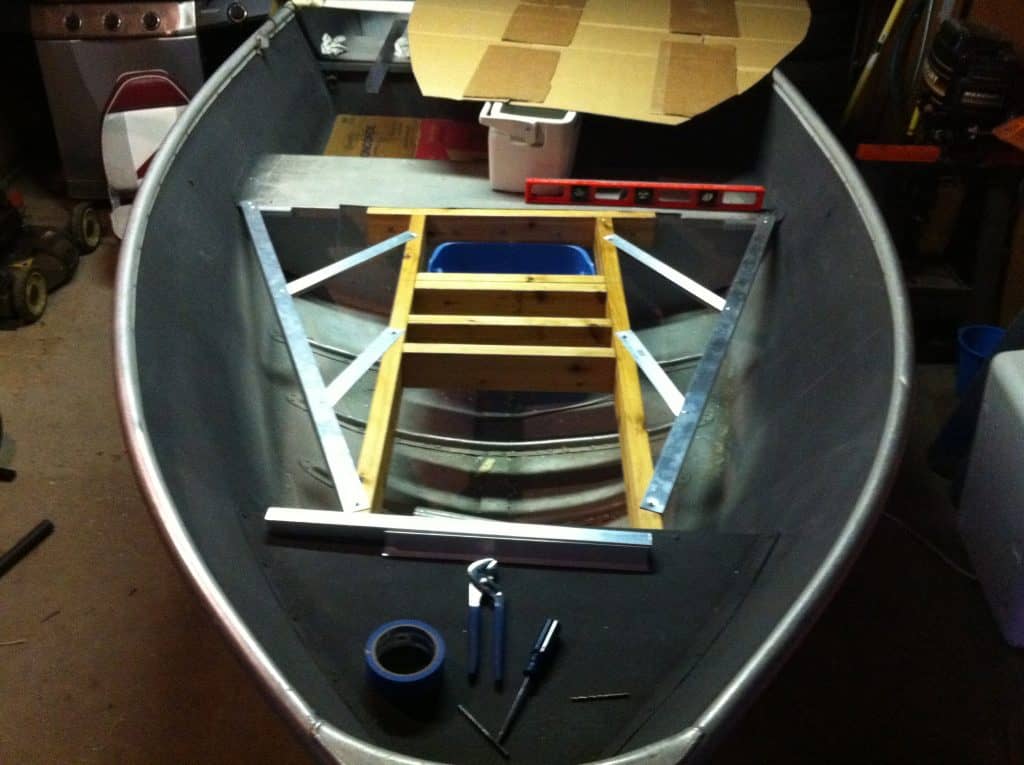
If you decide to use aluminum braces and bolt or weld them to the frame of the boat, you will need to measure and cut them to size first.
It is important to note that you should opt for square-edged aluminum piping. This is because it will be easier to weld to the frame of the boat, and if you plan to bolt it to the boat, you can easily attach L-bracket to it.
Constructing the frame with these aluminum pipes is pretty straightforward. Using the piping, you will create an “H” shape and bolt the pieces together. Typically, you will purchase aluminum pipe in a long length, so you will need to measure the dimensions of the “H” shape.
To do this, you can grab your tape measure and then measure the distance between the bow and the first brace or between the two braces. Then, measure the width that you think is sufficient enough for support. Add all these lengths together, and that will give you the total length of the piping needed.
Cut the aluminum pipe with a hacksaw or jigsaw, sand down the rough edges and weld them together or bolt them together using L-brackets.
If you are opting to create a detachable deck, then you will fabricate the braces from wood studs (approximately 28X70mm thick or a 2X1 wood spruce) and attach them to the underside of the casting deck. Instead of using an “H” frame design, you would consider the size and shape of your deck.
You would then design and manufacture a frame that would appropriately support the underside of the deck. Take into consideration if you have a cubby hole. We cant give you exact measurements or specifications on how to manufacture the frame because casting decks will vary in size.
However, you will still need to cut, sand, and join the frame using screws and perhaps wood or marina glue. You would then use the same method to attach the support frame to the casting deck.
Step 6. Treat The Deck And Install The Carpet
At this point, you have your detachable casting deck with the frame attached to its underside, or you have your deck and the aluminum “H” frame installed in your boat.
Take into consideration that would is susceptible to moisture and will deteriorate over time if not treated. Thus you will have to treat the wood with some wood sealant.
Check out this wood sealent on Amazon here
Make sure that you treat every inch of your casting deck (even the underside). Once this is complete, you will need to install the carpet. Once again, it will be beneficial to use marine-grade carpet because it is designed for wet weather, unlike standard carpet.
Check out this Boat Carpet on Amazon here
Depending on the size of your casting deck, you will need to get the correct amount of carpet. Make sure to purchase enough so that you have more than the area of your casting deck because you will be folding the carpet around the edges and underneath it.
Lay the carpet flat on the floor (or on a level surface area) and place the casting deck on top of it. Using a utility knife, you will cut out the shape of the deck from the carpet. Remember to leave space so as to fold it around and over the deck.
Once this is done, you will only need to fold the carpet over and staple it to the bottom of the deck. In some cases where the carpet is bulging, you may cut a slit at that point, so you are able to push it down and staple it into place.
Some individuals choose to stick and staple down the carpet to the casting deck. This will boil down to preference, depending on what you wish to do. However, take note that you do not have to use glue to stick down the carpet.
Step 7. Install The Casting Deck And Any Accessories
Now that the deck is complete, you will only have to install it into your aluminum boat. Most individuals opt not to bolt it down to the boat because, in any event, they are able to remove it with ease.
Lastly, you can install a swivel seat if you opt to do so. Installing a swivel seat is a bit beyond the scope of this tutorial, but the process is pretty straightforward. You will only need to drill into the deck and bolt the seat to it for the most part.
Remember that you have the option to bolt or screw the swivel seat to your casting deck because you have the ability to remove the deck from the boat at any point to make adjustments to it.
Project “Got A New Deck“ Boating
Check out our articles on: How To Beach A Boat: (Two Must Know Techniques!)